WHY LINUX IS STILL MORE SECURE THAN WINDOWS EVEN IN 2018

Linux is more secure than Windows and this is no secret. Many websites and companies alike all use Linux for their servers. Some Linux desktops are more stable than others that is true, but Linux servers have fewer attack surfaces thanks to the headless(lack of desktop) by default set up. Linux servers are sturdy as there is no graphical interfaces or other useless software getting in the way. Linux servers are, in my opinion, far superior to Windows servers. This is much to do with the lack of graphical tools as well as how the system is laid out by default. Linux files are placed in order on the drive, whereas a Windows machine is constantly in complete chaos. Always moving files around to and fro. In Linux, the file system is structured in a much more organized fashion.

Another way that Linux is more secure and better than Windows is that Linux uses separate accounts in Ubuntu by default. Manjaro is generally used in a similar way. Arch and Debian usually have it differently, one could argue this way is actually better, but it is more restrictive. In Debian, I have to log into root to install something, yet I can still use software from the standard user account. This isn’t remotely set up by default in Windows. This means that files and programs can only access what the user has access to while the user is running the program.

Linux security depends on the file being executable, this goes back to the filesystem in that files aren’t generally executable by default, this would cause memory and cpu issues, it would mean that any file could run rampant. Writing software for Linux is a different process than for Windows. In Windows, files are typically set to executable by default and this is by design. Windows is meant to be easily accessible, probably so much so that there are more viruses targeting it as a whole. File extensions also prohibit Windows viruses from running within Linux systems as Linux doesn’t have equivalent extensions. Linux itself isn’t the Operating System, contrary to everyone’s believe, it is the kernel, however, the kernel is audited every day by thousands/hundreds of thousands of people worldwide.

Most of the software on top of the Linux kernel is open-source. Open-source means that it is easily viewable as well. Every line of code can be read and accounted for. Many can’t read code, however, this doesn’t stop the many talented geeks who can. Generally this software is free, but regardless of the monetary status, Linux is open while Windows is behind closed doors.Windows is generally shut off from third party auditing. Also, unlike Windows, there is no telemetry collection either. This is something that is quickly becoming popular with computer users across the globe.

Lastly, Linux has exceptional tools for monitoring and intrusion detection(Tripwire, snort, etc). It’s no wonder why so many companies and website owners use it for their backend. Linux market share is rising on the desktop slightly as well. While it still has a way to go before it’s targeted so widely as Windows, it still shows promise, and what can be accomplished with open-source software. Moving forward, we should expect to see it prosper and bloom. Linux is the future.

Shameless Plug: https://github.com/jackrabbit335/UsefulLinuxShellScripts

CRON AND ANACRON

Task scheduling is an important and useful option built into both Windows and now Linux. For a while there, if you wanted to schedule tasks in Linux, it wasn’t as easy as Windows, technically, it still isn’t, however, it has grown leaps and bounds over what it used to be. With Linux you have a multitude of options, Cron and Anacron are just two such options. Today, we’ll focus mainly on these two, the similarities and differences. What makes each of them great, what might make one better than the other depending upon the individual circumstance. Task Scheduling in Windows was a difficult thing for me to learn as well, but it was pretty straight forward once I figured it out. In Linux, you have to either use the built-in Systemd timers or Cron/Anacron. Systemd is a really good thing to use if you are trying to be more precise with regards to timing, however, that is for a later article.

Both Cron and Ananacron use the system time, but what makes these two different is that Anacron runs 5 minutes after the computer is booted, then waits until the hour that the job was scheduled each day/week/month. Anacron is also picky about the shell environment used to perform system functions on such a basis. This could be a downside for new users who want to use third party scripts to handle maintenance and other things without them having to work at the system manually all the time. For those users, there is Cron, but it too takes a small amount of knowledge to set up. Crontab uses the system mail protocol which is the smtp server. Most things in Linux no longer require use of this tool as it is deprecated. This is not a requirement as many jobs can be forwarded to a log file as well from Cron.

Cron is a bit more simplistic to use, in Ubuntu, the Crontab file even has a basic outline of how to use the program. Crontab also offers a convenient Home Folder backup script in the Ubuntu version. Arch users are left with a clean file, they have to know the syntax to create their own jobs. One thing that Cron does have going for it though, it can use the Bash(Born Again Shell) or the regular shell. Cron has two modes, Root and User. The two separate modes will inact functions based on respective account privileges. If you are a standard user, you might find it difficult to run maintenance or backup tasks from Cron, whereas if you are a root, you will have an infinite amount of system resources to utilize at your disposal. Anacron uses the root account only to make changes to the system, such as; updates, apt-xapien, updatedb, mandb, logrotation.

Anacron has hours, days, weeks, months as its primary time settings, each of these is a separate folder that interacts on the system based on the time that anacron set it up to use when you installed your system. Both Crontab and Anacron are installed on most desktop systems and servers as of today, but this is not always the case, in Manjaro, Cronie has to be added in order to use the Crontab. In early versions of Cron, such as early Unix systems, Cron was thought of as a system service or Daemon, which was started via /etc/rc. At first, Cron didn’t have multi-user mode available on its own, it relied heavily on Unix systems for that, but in later versions, multi-user support was added.

Cron uses a pretty straightforward syntax. The syntax of Cron Table(Crontab), is as follows: ex. MM HH DOM M DOW Command to execute. In other words, you’d supply the minute(MM), followed by the hour(HH), followed by the day of month(DOM), followed by the month(M), followed by the day of the week(DOW). The minutes could be any number between 0 and 59, the hours could be anything between 0 and 23, the day of the month could be anything between 1 to 31, the month could be anything between 1 and 12, the day of the week could be any number between 0 and 6 with 7 being acceptable on some systems. The Command to execute could be anything the user writes, anything tailored for the user, and anything the system normally runs. For instance, if I wrote a script to update my hosts and named it hostsupdate, say I wanted to run it once, daily at around 5:30. I could simply run the following: 30 17 * * * /bin/bash /home/$USER/hostsupdate. Of course, at this time, that will run whatever is in the script, but if I wanted to check its work, I’d have to add the line cat /etc/hosts > hosts.log in the file. If I simply wanted to be alerted that it ran, I could type the cron job with > log1 and log1 would be created in my home directory. Another way that I haven’t tried, but might be possible, running two commands together in a crontab string. 30 17 * * * /bin/bash /home/$USER/hostsupdate && cat /etc /hosts > hosts.log. Note that for a script to update the hosts file, I need to run it using the BASH shell.

Depending upon your needs, Cron may be better than Anacron, however, if you just want to run a simple update procedure at the same time every day or week, Anacron is a great tool to use that is built into Linux systems already. Next week, I will probably be getting into /etc/rc and /etc/init.d along with system timers for Systemd. If you’d like to know more about these options for task scheduling in Linux, open a terminal and type man cron or man anacron. Also, there is a text based website that gives you similar information, link will be below.

Link for more: http://crontab.org

LINUX SPRING CLEANING PT2(HARDWARE)

As with the previous part of this topic, it’s good to do a routine clearing out of dust inside your pc. As to how often, it depends. If you ask two different people, you will get two different opinions. For some, this also depends on where you live. People living in Arizona typically have more dust in and around their homes, more cleaning is necessary and even then it still seeps into your machine. Dust and cigarette smoke are silent killers to computer hardware. Any smoke can be bad for a computer, it leaves a residue. Dust can also build up quick where there is a lot of smoke. It almost seems like the two go hand-in-hand.

But What can you do to remove such crap from your fans and heat sinks? Most computer owners use cans of compressed air religiously. These cans can be bought at your local Walmart or Office Depot. Many people used to take their machines to a neighborhood computer repair shop for the same maintenance rather than doing it themselves. As with all hardware, it’s good to eliminate as much dust as you can as dust is an insulator on electronics, but buying a 3 or 4 pack of canned air might save you upwards of 50 or 60 dollars. You’re welcome!

Last time, if you’ll remember, I talked about several commands that would clean the software you no longer wanted from your computer, some of these also removed unwanted files and debris. While this is probably not often needed on Linux machines as much as it is on Windows, it’s still good practice to free up space when you notice your browsers running slow or when you think your journal files might be corrupt(I’ll do an article about that later). I also added that I’d show you how to clean your /tmp directory, I haven’t forgotten, it’s just so super simple that you can do that with as little effort as rebooting or shutting down your system. This frees up cached RAM as well as removes any virtual files connected with it. Not only are these files not needed browsing data, this directory also contains copies of built or half built software in Linux. Windows doesn’t clean this directory automatically, but Linux does. In my scripts, there is a command which does this for you, but it’s almost redundant for me, because when I run the clean up function on my systems, I quite often reboot anyway.

With all that introduction out of the way, it’s time to move on to the actual cleaning. I’ll do these in steps so you don’t get lost.

WHAT YOU WILL NEED:

  1. Canned air

  2. Microfiber cloth

  3. water gel or 91 percent alcohol

  4. kleenex

  5. Paintbrush

HOW TO:

  1. First shutdown the device, this should be apparent by now, but electricity could kill you. Do this first

  2. Open the case, make sure to press the power button a few times to dissipate any remaining energy. When fooling with computer inards, it’s also best to touch the metal on the case first, but for this part you will hardly need it.

  3. Grab a can of compressed air(Duster). This should have a small straw that came with it, place the straw into the tiny hole on the nozzle. This sometimes likes to fall out so you’ve been warned.

  4. Hold the can of compressed air up to the cpu heatsink and fan, but don’t let it touch. Take a small pen or a finger and rest it between the fan blades so that the fan doesn’t spin. Spinning the fan the wrong way can cause damage to the fan.

  5. Now squeeze the trigger in short repetitive bursts. To knock dust free from the ridges of the heatsink, you may need to come back later with a small brush or something similar to try and clean this if it is still caked on. Be gentle with this method, some heatsink-fan combos do come apart, check to see if yours will.

  6. Next move to the power supply and try to blow from the inside out first. Use the same repetitive blasts as before, then change it up with longer ones. Then move to the back of the system and if you can, try to place a pen between the fan blades to keep it from spinning too much. This will force any other dust back into the system, so we will need to blow the case out further.

  7. Now move to the case fan, blow out both ends, then take a paint brush and try to sweep the remaining dust off of the blades as much as possible.

  8. Now blow any and all hard drive bays free of dust, also try to focus in on RAM modules, there’s not a lot you can do when they’re in their respective slots, but get as much as you can. This will make our job a little easier later.

  9. Now just blow randomly throughout the case, if your case has a rather closed front bezel on it, take that off and wipe/brush any ventilation holes and usb ports.

  10. Now it’s time to wipe out the exposed parts of the case itself and clean the ventilation holes on the cover. To do this I use a microfiber cloth with water gel, the same substance I use to clean my monitor, or I use a thin napkin or kleenex with 91 percent alcohol. The Alcohol doubles up as a solvent to remove thermal paste should you wish to replace the cooler or upgrade the CPU. It’s important to note that you won’t get every bit of dust with this part of cleaning, but you will get a majority of any dust that could potentially clog up your fans later.

  11. Another good, but optional step would be to pull the individual RAM modules, taking note of where each one goes, or pull them one at a time and replace them, this can help remove dirt. You will want to take a paint brush and gently brush the modules. It’s not often recommended that you touch the pins, however, it’s impossible to clean off the modules without touching them a little, this will clean any debris and blowing out the slot that the RAM was locked into is another good idea. RAM produces heat as well as anything else, so dust is a no-no.

As a followup, take the paint brush and brush gently over the heatsink-fan combo, the case fan, power suppy vents, vents on the case, and any pci cards protruding from the motherboard. This will help take any loosen dust that wasn’t removed with the air off of the surface. This is also good for getting along the edges of the fan blades. It’s sometimes good to blow out the machine every three months or so, but this is to be more thorough. Now that your computer is clean, you can hook up the cables and try to boot the machine. If everything boots fine, that’s it. It’s also possible to blow out the dust with a vacuum cleaner or a leaf blower, this is usually advised against because of the remote possibility that you could create a static charge against the motherboard with this method, however, I have never experienced this issue. Not once have I had to replace a motherboard with this method. That said, using the can air might be the better solution.

Link to scripts: https://github.com/jackrabbit335/UsefulLinuxShellScripts

LINUX SPRING CLEANING PT1(SOFTWARE)

Spring is almost upon us again. With spring comes the usual yearly cleaning that just gets so deep that it doesn’t happen any other time of year. The same thing should go for your computer. Over the year we’ve tested new software, saved copious amounts of web cache, stored various amounts of pictures and other files to the hard disk, on our Linux machines, we probably only booted our computers once anyway and so there are countless numbers of kernels and other system packages that maybe haven’t been applied. There is also the developer’s computer that may have all these extra files laying around from where he tried to solve a specific problem in a program and had to try various scenarios to get around it… No? Must be me then. All these things may or may not be needed now and so it’s a good idea to clear those out of the way to make room for new ones. In this, I stress the idea of making occasional home directory backups as well as a few of the commands that I use to clean my system, this is part 1, part 2 will deal more with cleaning inside the case. If you’re squeemish, that one may not be for you.

STEP 1

This step is quite simple.You first need to backup any data you don’t want to risk losing. This includes family photos, beats, personal documents and pretty much anything found in your home folder. To create a backup of your home directory just run the following:

sudo rsync -aAXv –delete –exclude={“/home/*/.cache”,”/home/*/.thumbnails”,”/home/*/.local/share/Trash”} ~/$USER/ path to backup directory

This should back up everything except the cache folder, the thumbnails folder and the trash folder. Pretty straight forward and then you’re done.

STEP 2

When cleaning your system, it’s important to start with the cached data and thumbnails that are not important to the system at all. The .cache folder is usually found in the home directory. This could account for upwards of 1 to 50 gigs depending on when you actually cleaned it out last. To clean this debris, we use the following commands:

sudo rm -r ~/$USER/.cache/*

sudo rm -r ~/$USER/.thumbnails/*

This will clean most of the junk data that we no longer need by itself. This does not clean browser history or cookies, if you want to clean those stay tuned. Next step will take care of the trash folder that is also located in the home directory.

STEP 3

Cleaning trash files is another important step, sometimes we can have trash that’s over a year old because we forget to clean it and the system never says anything, often it goes unnoticed. Often times when we “delete” a file, it gets placed there anyway. Removing this could save you a boatload of space. To clean this we use the following command:

sudo rm -r ~/.local/share/Trash/*

This will clean all relevant data in your home’s trash disposal. This is a great way to free up some potential gigs, but that’s not all, we have a few other steps on the way.

STEP 4

In this step, we try to clean out package cache. This is one of the biggest places to retain data and grow to enormous sizes. This is the cache that stores older versions of software. Most packages get built in the /tmp directory so we will clean there next. In this step we go over possible solutions for both Ubuntu-based and Arch-based distributions. This is dependent upon your current package management solution. To clean this area we use the following commands:

Ubuntu:

sudo apt-get autoremove

sudo apt-get autoclean

sudo apt-get clean

While this next one has multiple options, we will give you and example of each.

Manjaro/Antergos/Arch:

sudo pacman -rvk3

#This removes all but the latest three versions

sudo pacman -Sc

#This removes all but the latest version

sudo pacman -Scc

#This removes all versions

I have scripts that will handle this for you, but it’s important to learn which ones to use and when. For the most part, in Arch you probably only want to leave the latest three versions as this allows you to revert back later, but this isn’t always practical as package cache can take a lot of disk space, so when you are spring cleaning, I recommend using the second option. But this is still up to you.

STEP 5

When you’re cleaning the package cache anyway, it’s also important to clear orphaned packages. These are packages that are no longer connected to any dependencies and are usually no longer needed. These can add up if you’ve never cleaned them before. Ubuntu has a separate application you can install to do this, I will go over that here, Manjaro’s package manager can do that for you if you run a certain command. The easiest way to do this in Ubuntu would be to install gtkorphan which my scripts will include in the install list shortly. To do this in Manjaro and any distribution relying on pamac simply run the following:

sudo pacman -Rs –noconfirm $(pacman -Qqdt)

That is that!

STEP 6

This is the final step on this list, this will scan for broken symlinks and what I call shadow files in the home directory. These files and soft links are almost never needed. To do this run the following commands:

find -xtype l -delete

find $HOME -type f -name “*~” -print -exec rm {} \;

Stay tuned for part 2 of this cleanup tutorial, this concludes part 1.

Link to scripts: https://github.com/jackrabbit335/UsefulLinuxShellScripts

SOME BASIC COMMANDS EVERYONE SHOULD KNOW IN LINUX

A lot of people assume that Linux is a technical operating system, too technical for average users, however, since the earlier 2000’s it’s safe to say that most modern distributions and desktop environments have improved and are becoming more user friendly. All that said, linux users still should know a bit about the terminal and how much faster it can make certain day to day tasks. In this article, I’ll cover a small fraction of the useful commands that a user might want to use every day to gain system information, find out where in the file system they are located, update their system, manage services, do simple cleaning of cache resources and so on. Linux is not your regular Windows operating system, but with a basic knowledge, most users can find a way to make it work for them. Linux is a Unix like operating system, this means it’s closer related to Mac OS, however, unlike Mac, there are no hidden backdoors.

When choosing an operating system, most new linux users opt for Ubuntu, but a majority of the following commands can be used in all distributions. I’m running Manjaro currently, however, you can find a similar command or use the same one in your distribution to find out more information. Linux separates the root and standard user accounts by default, unless you’re in debian, you kind of have to add a separate account in Debian in which you will have to log in each time you want to upgrade or install software. That’s the eaasiest solution for me, but it’s a good one. Most distributions do add the regular user to the wheel if you use the same password for both accounts. By doing this you are closer to the root user, you still have to add a password to use the root account, but you do get added security that random programs can’t automatically run as root if ran by the regular user. Windows has a similar option for this to Debian. If Windows users recall, since at least XP they’ve been urged by many tech savvy friends to use separate accounts. This was for security.

Linux hides nothing and many distributions give you a leg up with either gui or cli applications to handle the heavy load for you. Linux also has man pages to help when searching for information on a command. The following commands will give you some examples and act as a starting point for anyone on any distribution to learn more. I am in no way an expert, however, these are rudimentary level commands so..

Command

Description

uname -r

Gathers information about kernel, can have different flags such as a or n see man uname.

pwd

Display the current working directory.

cd

Change directory. Have to follow with a slash and/or just the directory name.

whoami

Which user you are.

netstat

Displays network and port information, can be replaced with ss.

ls

List the contents of the directory.

lsblk

List block devices connected to system.

ifconfig, iwconfig

Similar to Windows ipconfig.

cat

List contents of file.

man

Access the man pages.

updatedb

Updates the file index, usually done automatically.

find

Add a file name or type plus directory to locate file.

clear

Clears the terminal screen.

which

When program is passed in argument, it shows the location of the program.

In addition to these basic commands, there are others that are good to know. The following lists a few important string style commands that use the root account to function. Most of these are either for maintenance or updating the system.

Command (Str)

Description

sudo apt-get update && sudo apt-get dist-upgrade -yy

Used in conjunction to update a system and it’s repositories in Ubuntu. Will not work in Arch(More on this soon). The &’s let bash know that you want to run the two together.

sudo rm -r

Is often used to clean a directory of all contents including files and folders.

sudo systemctl reboot

On modern systems, this reboots the machine.

sudo systemctl daemon-reload

Updates the status of systemd without rebooting.

sudo ufw status, enable, reload, disable

Controls the working state of the simplified firewall that interfaces with the underlying iptables.

sudo systemctl restart service

Used to control service states on systemd systems.

sudo rsync $dir1 $dir2

Copies contents of directory 1 to directory 2.

As you can see, once you know a few of these commands, Linux is no longer that scary. You can use this as a reference or cheat sheet for as long as you need. These are just a few of the many commands for Linux. Once you have a grasp of these, you could carry on with business without learning too many others. This is just a good place to start. I wager that most users would want to learn more though. Got a favorite command? Let me know!

Update:

For those who want a little more learning, here’s a few other commands that might be useful!

Commands

Description

free -h

Shows memory usage in human readable format.

df -h

Shows disk space usage in human readable format.

uptime

Shows uptime for user in number of days hrs and minutes. Also shows current load average.

MY OPINIONS ABOUT THE NEW MOVE BY UBUNTU

In recent blog posts, it is made quite clear that Ubuntu intends to collect user data. This option will be opt out at installation, but It will be kept fine print because Ubuntu really wants that information. Windows 10, Mac OS and even apple’s own iOS making news with shady privacy and performance hitting stuff lately, this was bound to happen eventually. Canonical, the company behind Ubuntu, the popular Linux distribution for new users, have proposed to collect hardware and software information from fresh installs of Ubuntu 18.04 LTS. With this data, they have agreed to only use it to make Ubuntu better, but when given how much information they will be collecting and considering what other companies have done with our data in the past, is it really a great choice to trust Canonical with our information?

Derivatives can potentially say no to this. There are options for developers of other distributions underneath Ubuntu’s umbrella. Linux Mint, Bodhi, etc. These distributions have their own say on what goes in or comes out every day, assuming that this ubiquity installer could be forked like any other software is no stretch. Also, if the developer team didn’t want to change the installer completely, they could opt to use a slightly older installer in the mean time, there are even other installer options available. Manjaro, Arch, Antergos, all have installers that are in no way connected to Ubuntu. A Linux youtuber recently raised the question, “What are you going to do?” with regards to the individual develoers behind such derivatives of the popular operating system. It is a good question indeed. A few distributions that are currently unaffected by this change are Manjaro, Antergos, Arch Linux itself, Apricity and Debian(The distribution that Ubuntu is based on). There are many forks and derivatives of Debian that were not mentioned, but the idea is the same for those as well.

While Ubuntu’s intentions might be good, it’s no small thing that they mentioned this right as all of this other data collecting and obsolecense is going on. Right on the heels of Windows 10 and MacOs, so too is Ubuntu progressively taking a step in the same direction. While it is understandable that this information might make things better in Ubuntu, there are plentiful users out there now who would gladly turn over a brief text file of system information to Canonical if the user has the control of the situation. At the end of the day, it’s up to you as the individual on whether you would keep trusting Canonical or not, but for the most part, Manjaro is a great and stable option for those who just want the spying and telemetry to end. Debian is also an option for new users. Debian is stable and doesn’t have Popcon and Apport like Ubuntu does. Not to mention, Debian is quite shy about allowing just any software into its repositories. While there is a testing branch, it is probably still a safer bet at this time than Ubuntu 18.04 if the proposal indeed passes. More on this as it becomes known.

VIVALDI BROWSER REVIEW AND SHORT TUTORIAL

For people in 2018 who are looking for a fast, stable, and flexible browser, Vivaldi more than does its share in that department. Vivaldi is a browser built by Norse company Vivaldi AS in Oslo, Norway. Vivaldi hasn’t been around as long, it was only released in 2016, but even at time of release, many users found it to be almost on par with every other long-lived and stable browser on the market. Vivaldi is built on open source software Chromium, with a more proprietary finish on top. They often rely on chromium codecs or codecs found on your system to handle playback, for this reason, Vivaldi might take some tweaking to get fully working on some Arch systems.

Vivaldi doesn’t track its users, the founder of Vivaldi was the co-founder of Opera and many of his beliefs during his time at Opera came to Vivaldi with him. In Norway, there are stronger regulations dealing with tracking and the like as opposed to the United States. Not to get too political in this review, but the founder of Vivaldi himself has been cited saying that there needs to be better regulation with regards to the immense level of tracking that goes on these days. Note, Vivaldi doesn’t track users, however, they do collect platform information to determine the userbase across Windows, Mac and Linux, if this bothers you, you can choose another browser, but most browsers these days collect copious amounts of data.

Vivaldi browser is feature rich out of the box, something that many browsers today are lacking, it has innovation, changeable and configurable interface design. The browser at time of writing is based on Chromium 64, the latest version to date. Both versions of Vivaldi have that in common. Yes, for those who want bleeding edged software, Vivaldi has a Snapshot option that caters to you. Vivaldi-Snapshot features all the usual configurations and tab stacking with the added sync feature. Sync is a feature that Opera has had for a while now and Vivaldi only recently started implementing it. The reason was always that Vivaldi wanted to do it correctly before passing it on to mainstream. As far as I can tell, the feature really does do what it says. I have yet to notice any complications. The browser opens quick in the new Snapshot version which is version 1.15 on their website(my version is 1.15.1099.3). For all other users, there is a 1.14 version that is currently the stable channel.

Upon start up, Vivaldi has a quick setup menu which runs you through a few steps to make Vivaldi look the way you want it to, but it doesn’t go very in depth. To get more settings, you have to click on the V icon in the Left-top-corner of the browser window  
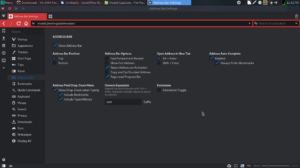
and go to Tools > Settings. The Settings dialogue pops up with various settings. Each configuration has its own separate tab. Themes, Appearance, Start Page, etc. Under appearance, I usually check the box that allows settings to open in a new tab.  
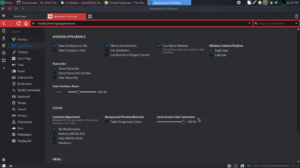
This will make settings take a full page next time. If you want performance over crazy effects and features, the settings tab under Appearance might also have benefits for you, This tab also lets you set or unset animations and use native window management(Adds a native looking border around window). This might be helpful on lower spec systems. Also disabling fast forward buttons in address bar might help as well.

When it comes to features, Vivaldi definitely has something for everyone, a browser built with power users in mind. Vivaldi also offers keyboard and mouse gestures. The browser allows for tab stacking and rearranging which is something that other browsers don’t seem to have at the current moment. Vivaldi has a function that controls audio in tabs, but sadly, doesn’t let you pause background tabs which play video out right. To do this, you kind of have to go into the tab bar and right-click and look for Hibernate Background Tabs option. This will essentially slowdown, or completely stop running tabs in the background which is fantastic if RAM and processor power are important to you. Vivaldi is definitely a fine replacement for Chrome and Firefox as of 2018. For more information, go to their website, link below.

Link to Vivaldi website: https://vivaldi.com

Link to podcast featuring Jon von Tetzchner: https://vivaldi.com/blog/jon-speaks-to-the-community/?utm_content=buffer573e9&utm_medium=social&utm_source=twitter.com&utm_campaign=VivaldiSocial

FOLLOW UP TO THE EARLIER ARTICLE ABOUT THE MELTDOWN/SPECTRE VULNERABILITY

Earlier today, I published an article here on my blog about the recent flaws found in kernels and processor firmware. I was a bit vague and unclear, but after doing more reading, I can give you a small set of instructions in regards to possible workarounds for now. These are just temporary and they may include a potential increase in RAM usage for those using these applications. Google-Chrome has yet to release their own workarounds inside the browser for the mentioned vulnerabilities on their side, however, the Chromium project released a small post about how users could reduce the attack vector in the browser by enabling one or two possible back end features themselves. Here I will attempt to better explain what this is and how to reduce your own vulnerability, assuming that you’re on Chrome or another chromium based browser.

The recent vulnerabilities are targeted at all processor architectures and as I previously mentioned, do make use of Kernel memory via going through the User as before now the kernel had no way to stop this, but recently, it appears that AMD has increased their own security on the issue and the Linux kernel now uses something called KPTI(Kernel Page Table Isolation) Which essentially allows the kernel to separate itself from Userspace in memory. It’s like a wall between what a user is doing on a PC and what the PC is doing in the background. This is only further boosted when certain mitigation techniques are taken inside of net facing applications. Google- Chrome has a back end flags page which holds a wealth of experimental security and performance enhancing features. This same back end applies to both Opera as well as Vivaldi.

To enable this feature of Site Isolation or Strict Site Isolation you must do the following:

  1. Open up Google-Chrome, Opera, or Vivaldi

  2. Go into the address bar and type Chrome://flags or Opera://flags for Opera

  3. Search for enable-site-per-process

  4. Next to Strict “Site Isolation”, click enable

  5. Relaunch the browser

Most all chromium based browsers now have this setting at the moment. I wouldn’t count on this being there forever though, each update with Chrome and something changes. This is a good temporary adjustment that you can do to limit the amount of sites being opened in a single process. This will increase memory by possibly as much as 20% though. As I said earlier, future updates in the next week or so will include other workarounds inside the browser that effect buffer array and timing which are a couple of things that this attack would rely on.

As I mentioned in the last article, Pale Moon was not vulnerable as far as I can tell. The developer always does great work securing certain features that the Mozilla team haven’t thought of yet. As far as Mozilla goes, version 57.0.4 of Firefox should include a timing adjustment that slows this attack in its tracks. Intel seems hesitant to fix anything, but at least AMD have stepped up their game a bit. This vulnerability was known about for years and AMD already implemented basic safeguards for this sort of atrocity Short of physical access though, you’re pretty much safe at this point. I would make haste though for anyone running Linux to either search in their repositories for a newer version of the kernel or possibly look into compiling their on from source on kernel.org. More updates will be out next week and Google will update Chrome by the end of January.

More Reading: https://forum.manjaro.org/t/kernel-page-table-isolation-kpti-severe-arm-intel-cpu-bug-hits-partly-amd/37506

https://support.google.com/chrome/answer/7623121

LINUX FIREWALL APPLICATIONS pt.1

The Linux firewall is managed by a service called Iptables. Iptables is a net-filter built into the Linux or Unix kernel. It is used even when third party applications are called. Iptables was initially released in 1998, but since has had a rewrite in favor of a new utility to be written into the kernel. People still use Iptables, most companies utilize this over third party applications just because they don’t want a middle man in between them and the computer’s settings. It is also more powerful using Iptables over third party applications as well because you’re interacting directly with the Kernel. Some third party applications that I frequently use include UFW for command line working with the firewall and GUFW for a gui for t he same command line firewall. Fedora and Red Hat have their own firewall service as firewall daemon. The Linux firewall is more robust than the Windows firewall in that it doesn’t try to discriminate traffic. It tells the user in the form of logs who is talking to each port.

The Linux firewall is easy to set up on most Debian and Arch-based systems. Simply type the following command to check the status of the current configuration: sudo ufw status verbose. This will tell you any services you have rules set for and will tell you whether or not the firewall is active. If the firewall is not active on startup, it’s possible that the service was not started in your init system. Most systems use Systemd for their initialization service now, so we will use that in this case. To enable the firewall in this case, use the command sudo systemctl enable ufw && sudo systemctl start ufw. This will initialize the firewall service in Systemd after giving Systemd control of it. To disable you would simply use sudo systemctl stop ufw && sudo systemctl disable ufw.

Assuming that you’ve started your firewall in the init system on your computer, it’s a good idea to issue the command to the program itself sudo ufw enable. This command will enable the firewall on your current active session. Once completed, most users won’t need extra tampering and configuration to be done to their firewall, however, if you wish to tinker, or if you use certain services that the firewall doesn’t already have a preset for, it might be a good idea to allow that service through. It also might be a good idea to set some deny rules for some services you don’t use, such as SSH and TELNET. These two services are fun to use, they allow a user to communicate with their computer remotely, but they are often seen as a potential attack vector as well. To deny a service, it’s straight-forward. All you have to do is type sudo ufw deny and the service name. For example, we’ll use SSH. Type sudo ufw deny ssh. That’s it, you’re done, but I should warn you, if you use SSH, it’s a bad idea to do this. Also, if you torrent a lot, it might be wise to set up port forwarding. Port forwarding is done by allowing a service through a specific port with a specific protocol and then setting that application or service to use that same port. For example, sudo ufw allow transmission-gtk. This tells UFW to allow all incoming through the port that Transmission(Bittorrent client) uses. It would then be a good idea to type sudo ufw reload to reload the firewall to accept the new settings.

My bash scripts on github, also have the ability to enable the firewall and set ssh and telnet to deny for you should you wish.

https://github.com/thedummy06/Helpful-Linux-Shell-Scripts

VIVALDI LIMITED HTML5 IN MANJARO AND WHAT I DID TO GET IT WORKING WITHOUT USING THE AUR

I did a bit of a review on Vivaldi before. I said that the browser was good and had a great team behind it, I also spoke briefly about the endless array of features within it. What I didn’t mention is codecs support and how it differs heavily from Opera in this regard. Most browser rely heavily upon the Operating system for codecs as well as their own supporting library packages. Most of these have libraries for extra codecs in the AUR on an Arch-based distribution. This is fine, but installing packages from the AUR takes a lot of time and installing FF mpeg codecs for Vivaldi takes even longer. What I did to avoid this step was to install opera and it’s extra codec support which are both found in the standard repositories right now in Manjaro. I then proceeded to go into the terminal and find where the new library was placed for Opera. In my case, it was in /usr/lib/opera/ and under the directory of lib_extra. I went into this directory via terminal and used t he command sudo cp libffmpeg.so and pointed it to my Vivaldi directory in /opt/vivaldi. Vivaldi uses the same rendering engine as opera, so this wasn’t enough to break the browser, it also gives me almost full html5 support on Youtube. Many videos didn’t play because they used a non standard codec. This was annoying to say the least. Anyway, what you may find is that there is already a basic libffmpeg library in /opt/vivaldi/lib/, however, that library is limited to basic support. This is the extra package. Furthermore, if your browser is already open, it’d be a good idea to close and reopen it. Vivaldi is an extremely good browser, it’s more than a contender for Opera when you are willing to get your hands dirty.